If you’ve mastered the basics and are ready to crochet your first wearable garment, a crochet vest pattern built from granny squares is an excellent next step. This guide breaks down the practical skills, yarn and hook choices, construction methods, and troubleshooting tips you’ll need to choose and confidently start a beginner-friendly granny square vest. By focusing on what matters most for fit, comfort, and a polished finish, you’ll set yourself up for success—before you ever join that first square.
Key Takeaways
- Granny square vests use simple, repeatable motifs for easy construction and flexible sizing, making them ideal for first-time garment makers.
- Choosing forgiving yarns and practicing motif consistency are the keys to a wearable, drapey result without complex math or advanced skills.
- Blocking, careful joining, and basic finishing techniques transform a set of squares into a neat, professional-looking vest you’ll be proud to wear.
- Quick overview — what a granny‑square vest is and why it’s a good beginner garment
- Skills and techniques a beginner should know before starting
- Best yarn types, weights and hook sizes for a comfortable beginner vest
- Sizing and fit — practical approaches for granny‑square vests
- Making granny squares efficiently and consistently
- Assembly and joining techniques for a neat, wearable vest
- Finishing touches and professional-looking tips
- Common beginner mistakes and how to avoid them
- Simple customization ideas that stay beginner-friendly
- Time commitment — what beginners can realistically expect
- Choosing between a granny‑square vest, cardigan or sweater as a beginner
- Resources and next steps
- Frequently Asked Questions
Quick overview — what a granny‑square vest is and why it’s a good beginner garment
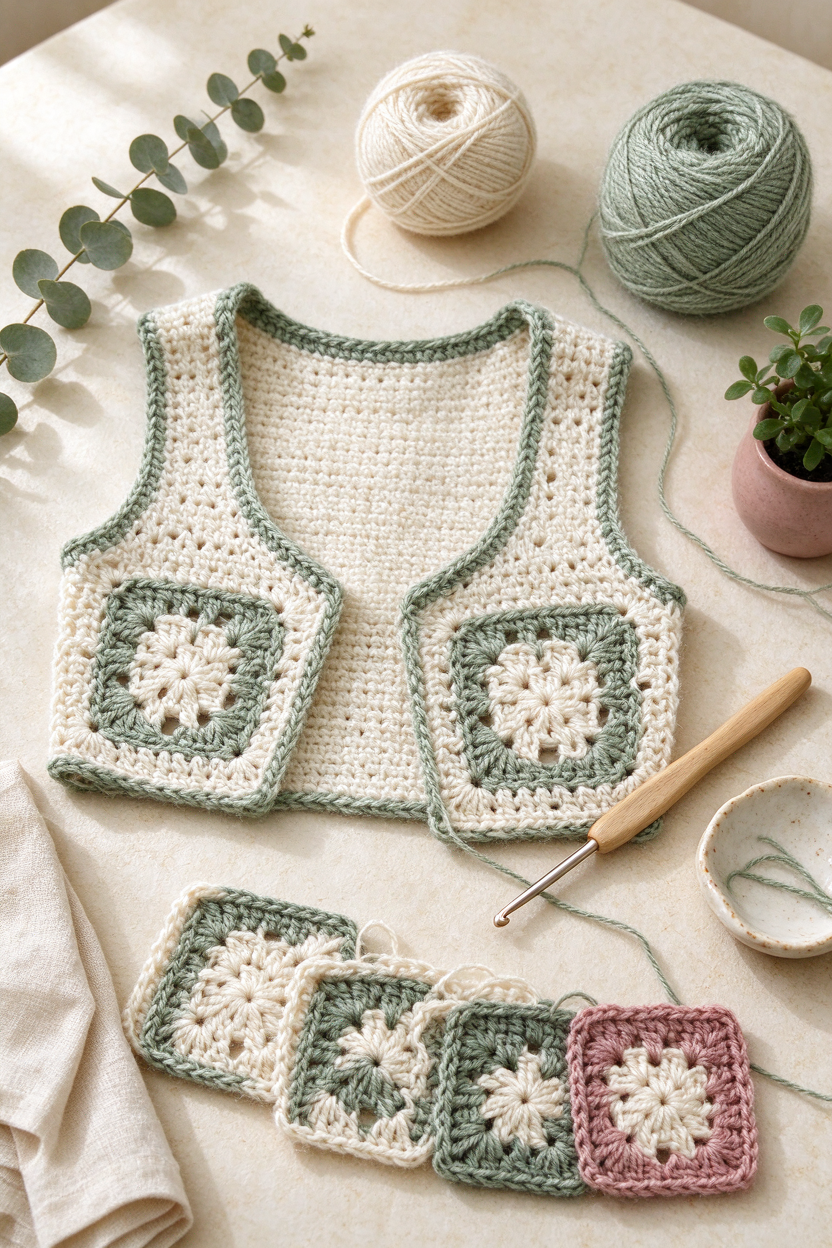
A granny square vest is a handmade crochet garment created by joining multiple granny square motifs into panels that form the front, back, and sometimes the sides of a vest. Instead of working the garment as one complex piece, you build individual motifs—small squares made in rounds using clusters of double crochet stitches separated by chain spaces—and assemble them together, typically in a grid.
Why is this construction so approachable? Unlike sweaters, a crochet vest pattern made from granny squares doesn’t require complex sleeve shaping or intricate garment math. This makes the project extremely forgiving for beginners:
- Each square uses the same basic stitch pattern, so you can practice your technique without learning new stitches for each section.
- No sleeves or challenging shaping—panels are flat or nearly flat, assembled with simple seams.
- You can adjust for fit as you go by testing your squares and tweaking the vest’s width or length with extra rows or columns.
This article will help you:
- Identify the skills you really need before starting a granny square crochet vest pattern
- Choose yarns and hooks that improve your odds of a comfy, wearable garment
- Understand a safe, practical approach to sizing and fit
- Master essential joining and finishing steps that make your crochet look crisp and professional
- Troubleshoot common beginner frustrations—and personalize your design!
Skills and techniques a beginner should know before starting
Crocheting square patches for a vest might sound simple, but a little preparation goes a long way. Before you follow any crochet vest pattern or invest in supplies, check off these foundational skills:
- Master chain (ch), slip stitch (sl st), and double crochet (dc): These three stitches are the foundation for nearly every classic granny square. If you want a refresher, see TwirlBloom’s beginner crochet stitches guide.
- Learn to work in rounds: Granny squares start from the center and expand outward round by round. Get comfortable making rounds in motifs before committing to a full garment.
- Practice with a test granny square: Make one full square to get a sense of the method, and use it for practice blocking (wetting and shaping to an even size).
- Read simple pattern instructions: Look for patterns described as “beginner” or “easy,” which use plain stitches and clear repeats. You don’t need to read complicated charts for basic granny square vests, but following standard motif directions is a plus.
- Try basic seaming/joining: Practice joining two test squares neatly using a slip stitch seam or a whipstitch with a yarn needle.
Building confidence with these techniques means your first garment will come together more smoothly. If you need more confidence, try a blanket or scarf first—see TwirlBloom’s granny square crochet guide for more motif practice ideas.
Best yarn types, weights and hook sizes for a comfortable beginner vest
The right yarn and hook can make your first granny square vest both easier to crochet and more pleasant to wear. Here’s what to pick as a beginner exploring granny square crochet pattern projects:
- Yarn weight:
- Worsted/Medium (category 4) yarns are the workhorse for vests—a good match for durability, stitch clarity, and stress-free joining. They create a vest with some substance, but not too heavy if you avoid dense cottons.
- DK/Light-Worsted (category 3) yarns offer a lighter feel and a softer drape, suitable for spring/summer garments or those who want less bulk.
- Yarn fiber: Beginners often prefer soft acrylic, cotton blends, or “baby” yarns that aren’t scratchy and wash easily. 100% cotton is cool but can be stiffer or heavier in worsted weights; blends add flexibility.
- Hook size:
- Most granny square vest patterns recommend hooks in the 4mm–6mm range.
- Worsted/medium yarn works well with 5mm or 5.5mm hooks (per Lion Brand’s beginner checklist), while lighter DK yarn often pairs with 4mm–5mm hooks. Always check your yarn’s label and your own tension in a test square.
- Care and comfort: Pick yarns you like to touch and are willing to wash by their care label. Avoid slippery synthetics for your first project as they can make consistent tension and seaming harder.
Whatever your choice, always make a test motif to check size and drape—you can adjust hook size up or down by 0.5mm increments if the square feels too stiff or too loose (Lion Brand).
Sizing and fit — practical approaches for granny‑square vests
One of the best beginner advantages of a crochet granny square vest pattern is that you can build the fit panel by panel, adjusting as you go:
- Crochet and block a test square: Once you have a motif you like, wet and block it to its finished shape. Measure its width and height. This will be your “unit size.”
- Estimate how many squares you need: Use the width of your favorite vest or a tape measure around your chest to estimate how many motifs you’ll need across and down. (“How many squares wide is enough for a comfortable fit?” is far simpler than recalculating the entire pattern.)
- Tweak for fit:
- Add or remove columns for a looser or more fitted style.
- Increase or decrease the number of squares for length. A cropped look is just a row or two shorter than a hip-length vest.
- Look for patterns written in multiple sizes for a shortcut—these will provide a motif count per size.
- Test with temporary joins: Pin or loosely join your motifs together and hold (or try on) the panels to see how everything lines up before making permanent seams.
This approach keeps the math manageable and lets you safely change course if something feels off during assembly. If you need more on basic motif measurement, the Lion Brand granny square guide explains the value of blocking and measuring your motifs first.
Making granny squares efficiently and consistently
Consistent squares mean easier assembly and a more professional vest. Here’s how to get there:
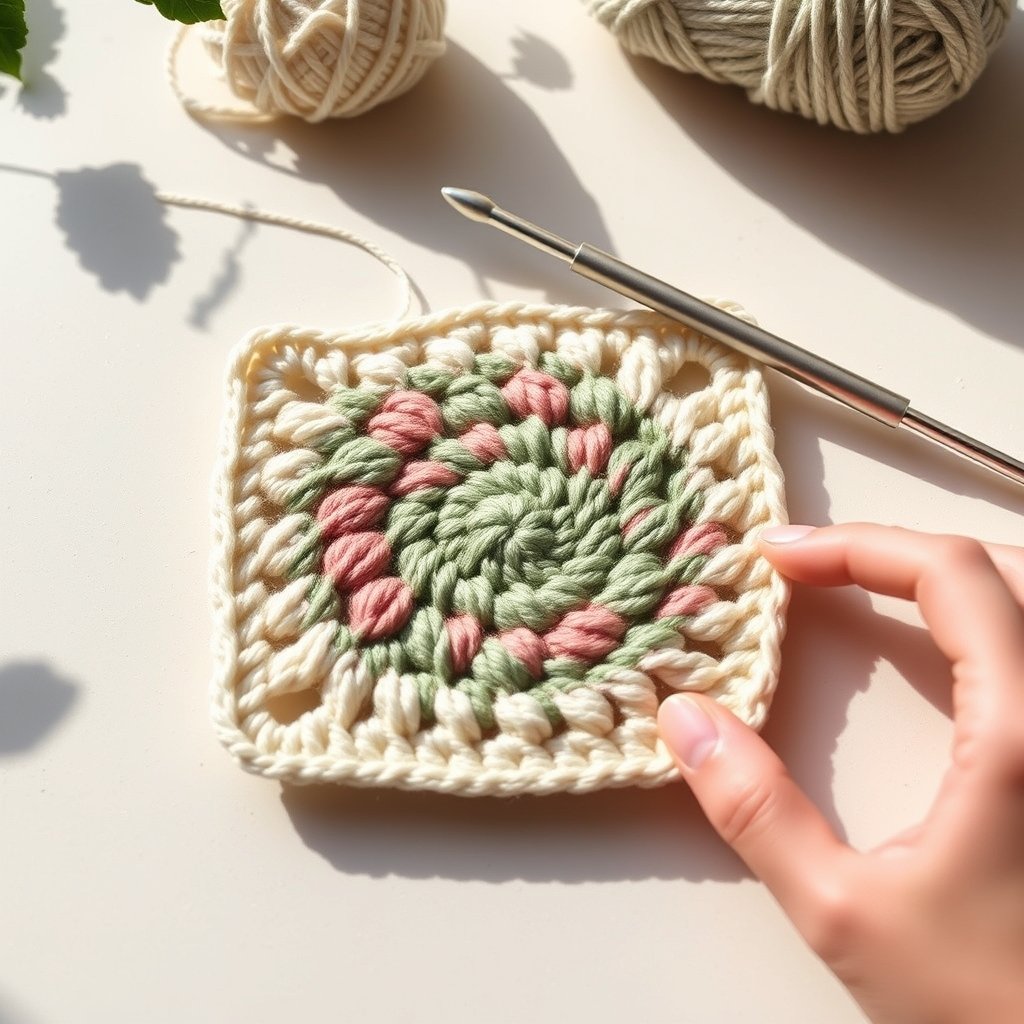
- Start the motif: Most patterns begin with either a magic ring (adjustable circle) or a chain‑4 loop joined into a circle. Both methods give you a center to work your first round of clusters.
- Traditional granny construction: Work in rounds of three‑double crochet clusters, with chain spaces at the corners and between each group (see a basic explanation at Interweave).
- Maintain consistency:
- Use the same hook size and yarn for all motifs.
- Try to crochet motifs in batches—“muscle memory” will help your squares stay the same size.
- Block every square before joining; this evens out size variation and makes the pieces easier to seam together neatly.
For those new to the motif, detailed pictures and stitch-by-stitch support are often included in patterns or video tutorials. Practicing with basic squares before starting your garment is time well spent. For a more in-depth look at granny square motif technique, you might check out TwirlBloom’s granny square crochet pattern guide or the LoveCrafts beginner tutorial.
Assembly and joining techniques for a neat, wearable vest
Granny square vests look best when motifs are joined evenly and the seams feel comfortable to wear. Here are beginner-friendly assembly steps:
- Block all motifs before joining: Evenly sized squares make joining much easier and result in crisp, straight panels.
- Lay out your design: Arrange your blocked squares into panels for the front, back, and sides. Ensure you like the color placement and check panel widths against your body or a favorite top.
- Choose your joining method:
- Slip-stitch join: Held-right-sides-together and joined with a slip stitch, this seam is slightly visible on the outside but flat and tidy.
- Whip-stitch/sewn join: Uses a blunt needle and yarn to sew through edge stitches. It creates a less visible seam; works well for soft or delicate fibers.
Both methods are beginner-appropriate and easy to find tutorials online or within most crochet granny square vest pattern PDFs.
- Join panels into a vest shape: Join the front and back at the shoulders and sides, leaving space for the armholes and neckline as indicated by your chosen pattern or your fitting tests.
- Finish edges: Many patterns recommend a single row (or two) of single crochet or another simple border around the neckline, armholes, and hem to add durability and a finished look.
For detailed seam and edging tutorials, you can refer to TwirlBloom’s granny square techniques post.
Finishing touches and professional-looking tips
The final polish makes the difference between “homemade” and “handmade”:
- Final blocking: After seaming, give your finished vest a gentle block to help panels lie flat and edges even out.
- Weave in ends carefully: Hide yarn tails inside seams or stitch backs for a cleaner look and less risk of unraveling.
- Consistent edgings: A single or double row of matching yarn around the vest’s edges stabilizes the garment and gives a crisp outline. (Check your pattern for suggestions.)
- Read yarn care instructions: If you plan to wash your vest, choose yarns that match the care methods you’re comfortable with—machine wash only if the label allows.
Common beginner mistakes and how to avoid them
Granny square vests are beginner-friendly, but some hurdles can slow your progress. Watch out for these common issues:
- Skipping the test motif: Without a gauge swatch, your motifs may end up the wrong size, making the vest too tight or too loose. Always test and block one square first.
- Changing hooks or tension: Switching hooks mid-project or inconsistent yarn tension can give you “wonky” squares. Use the same hook and batch-make motifs.
- Bulky or bumpy seams: Not blocking motifs before joining, or using a too-thick yarn for seaming, can create ridges that feel uncomfortable. Join blocked squares and use a matching, smooth yarn for seams.
- Unsuitable yarn choice: Stiff or shiny yarns can make a vest uncomfortable; non-washable yarn means you can’t easily launder your garment. Stick to soft, recommended yarns and check care labels.
If you run into trouble—stop, assess with a test fitting, and adjust before continuing. Patience pays off!
Simple customization ideas that stay beginner-friendly
Once you have the basics down, a crochet vest pattern offers so many easy ways to add your personal touch—no advanced techniques required:
- Play with color: Use a single yarn color for a classic look, or create planned combinations (each round a different color, or alternate squares). Laying out your motifs before joining shows what works best.
- Length and fit: Add or subtract rows of motifs for a cropped, hip, or tunic length. For a unique outline, add a simple, scalloped edging across the hem.
- Edge and styling options: Add belt loops or leave off the side panels for a more open tabard look. Keep any adjustments “motif-based” (e.g., working with whole extra square rows) to avoid complex shaping.
If you want to try even more garment projects, you can explore scarf or blanket motif patterns (see TwirlBloom’s guide to blanket patterns for varied uses of granny squares).
Time commitment — what beginners can realistically expect
While the total completion time depends on your pace and the vest’s size, there are a few expectations supported by research (Lion Brand):
- Most crocheters can complete a 4–6 inch granny square motif in under 20 minutes once comfortable with the technique. Your first few may take longer while you learn the rhythm.
- Total project time varies with motif size, the number of squares, assembly, and finishing. Batching (working several motifs in a row) helps you establish muscle memory and may speed up your progress.
- Don’t rush—allow for time to block, join, and finish, ideally over several sessions.
A practical strategy: break your project into blocks—motif-making, blocking, joining—so you can celebrate each step along the way.
Choosing between a granny‑square vest, cardigan or sweater as a beginner
If you’re deciding between garment projects, here’s how granny square vests compare to other first wearables:
- Granny square vest: The most accessible garment pattern for beginners—repeats the same motif throughout, little or no shaping, no sleeves to complicate assembly.
- Crochet cardigan: Typically requires an open front and sometimes button or band shaping. Beginner patterns exist—look for ones labeled as such, or with a “block” style (fronts/back panels + sleeves).
- Crochet sweater: More advanced due to shaping of sleeves, armholes, and neckline. Best attempted after completing a vest or easy cardigan.
For more beginner project ideas, browse TwirlBloom’s easy crochet project guide.
Resources and next steps
Feeling inspired to begin your first vest? Here’s how to turn ideas into a finished project:
- Choose a pattern: Download a crochet granny square vest pattern that lists motif counts for different sizes, with clear instructions for construction.
- Brush up on motif technique: If you need an extra boost, review step-by-step granny square tutorials, blocking instructions, or seaming technique on TwirlBloom or through recommended video sources.
- Gather your tools: Make a checklist—yarn, appropriate hook, blocking pins, a seaming needle, and plenty of patience!
- Test before you commit: Practice with one full motif; block and measure to confirm you like the size and feel before making an entire batch.
If you want to try out a motif-based vest pattern, browse TwirlBloom’s crochet PDF patterns in the shop and find one that suits your yarn stash and skill level.
Frequently Asked Questions
What basic stitches do I need to know to make a granny square vest?
You should be comfortable with chain (ch), slip stitch (sl st), and double crochet (dc) stitches, plus working in rounds for traditional granny squares.
How do I know which yarn weight and hook size to choose for a wearable granny square vest?
Most patterns use worsted (medium) or DK (light-worsted) yarn, paired with a 4mm–6mm hook. Make a test motif and adjust your hook by 0.5mm if your motif feels too tight or too loose.
How many granny squares will I need to make a vest that fits?
Make and block a test motif, measure its width, then estimate how many you need to reach your desired chest and length measurements. Adjust by adding or removing squares as needed.
How should I join granny squares so the seams look neat and comfortable?
Common beginner methods are slip-stitch joins and whip-stitch seams, both of which create tidy joins when squares are blocked to an even size before assembly.
Can I make a granny square vest machine washable?
Choose a yarn labeled as machine washable and follow the care instructions. Many acrylics and some blends are suitable for easy washing.
How can I adjust the length or width of a granny square vest without reworking the whole pattern?
Add or remove rows or columns of motifs for more length or width—keeping adjustments consistent (using whole squares) makes modifications easier and beginner-friendly.